
You know that awkward phase in product development where a 3D print looks right… But doesn’t behave like the real thing? That’s where RepMold-style thinking shines—getting you prototype parts that feel closer to production without jumping straight to expensive tooling. SCOP Magazine readers who build, test, pitch, and iterate quickly will recognize the pain (and the payoff).
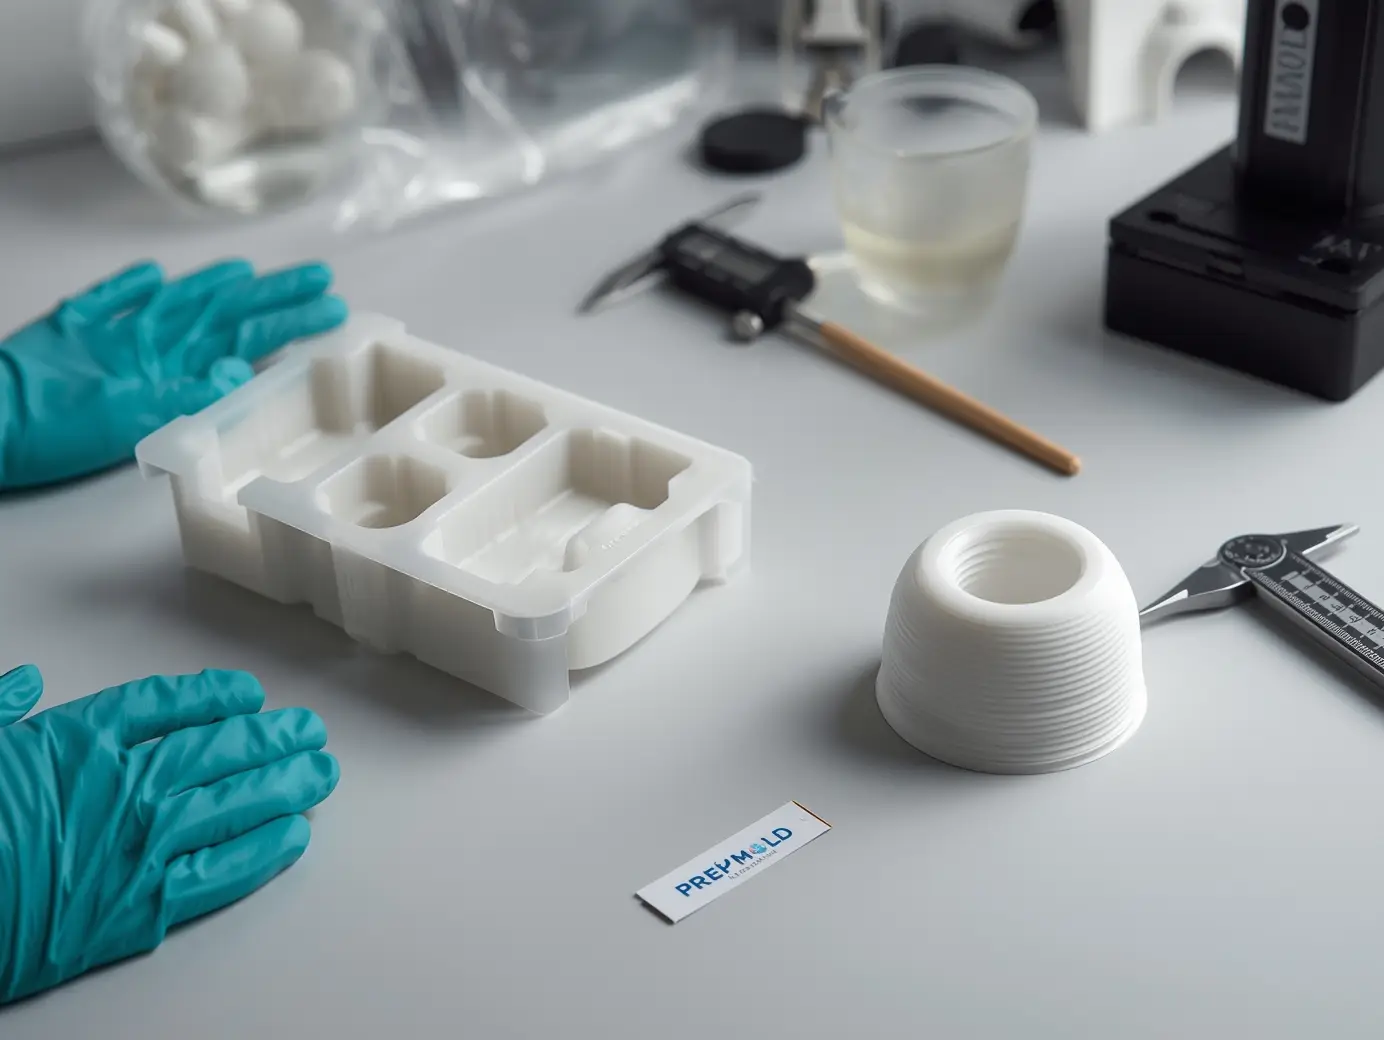
RepMold is a rapid prototyping approach that combines a 3D-printed “master” part with silicone molds and urethane casting to produce small batches of realistic prototypes fast. It’s useful because you can iterate designs quickly, test fit and function with production-like materials, and make multiple copies without paying for traditional injection mold tooling or waiting months.
Key Takeaways
- RepMold helps you turn one good “master” into multiple repeatable cast parts using silicone molds.
- It’s ideal for short-run production and functional prototypes that need better realism than basic 3D prints.
- Urethane casting offers material options (rigid, flexible, clear-ish) that can mimic production plastics.
- Compared with injection molding, the upfront cost and commitment are much lower, but the per-part cost is higher at volume.
- Most failures come from a poor master, weak venting, bad mold splits, or rushed curing.
- Use RepMold when you need dozens, not tens of thousands.
- It’s a strong bridge between “prototype” and “manufacturing decision.”
What is RepMold?
At its core, RepMold is a practical workflow:
- Make one high-quality master (often via high-res 3D printing or CNC).
- Build a silicone mold around that master (RTV silicone is common).
- Cast multiple copies using urethane (or other castable resins).
What it is
- A way to replicate a part design quickly, once you have a solid master
- A “middle lane” between pure 3D printing and full production tooling
- Great for product development teams who need realistic test parts
What it isn’t
- Not the same as traditional injection molding (no steel/aluminum production tool)
- Not best for ultra-high volumes or the tightest possible tolerances
- Not magic—your results still depend heavily on design and process discipline
One natural “link moment” you might include in a resource roundup is: If you’re exploring rapid mold workflows, RepMold is a useful starting point because it highlights how silicone molds + casting can scale prototypes beyond one-off prints.
Definitions
- Rapid prototyping: Quickly creating physical versions of a design to test form, fit, and function.
- Silicone mold (RTV mold): A flexible mold made from room-temperature vulcanizing silicone used to replicate parts.
- Urethane casting: Pouring liquid urethane resin into a silicone mold to create production-like prototype parts.
- Lead time: Total time from final CAD to parts in hand (including making the mold).
- Short-run production: Small batch manufacturing (often tens to a few hundreds) before committing to full tooling.
How RepMold works
The simple explanation
You 3D print (or machine) a “perfect” version of your part once. Then you make a silicone mold of it. After that, you can pour or inject urethane resin into the mold to create multiple near-identical copies—fast enough for real testing, demos, and early customer feedback.
A more technical note
- Master quality matters: Layer lines, print artifacts, and dimensional errors transfer into the mold and show up on every casting.
- RTV silicone mold-making: Liquid silicone cures around the master, then the mold is cut (or designed as a two-part mold) to remove the master.
- Casting behavior: Urethane resins can be mixed to different hardness, flexibility, and appearance; vacuum/pressure steps can reduce bubbles (optional but helpful).
- Wear-out reality: Silicone molds degrade over repeated casts—so plan on a limited number of pulls per mold, and keep your master safe for remakes.
Pros / Cons
Pros
- Fast iteration: Change CAD → print a new master → remake the mold quickly.
- More realistic parts: Cast materials can behave closer to production plastics than many basic prints.
- Repeatability: Multiple copies allow A/B testing, user trials, and small pilot runs.
- Lower upfront commitment than injection molding tooling.
Cons
- Mold life is limited: Silicone molds wear out over time and can tear.
- Per-part cost stays higher than injection molding at scale.
- Design constraints exist: Undercuts, thin walls, and tricky vents can cause defects.
- Finish depends on the master: A rough master gives rough castings.
Best For
- Startups needing pitch-ready prototypes that look and feel credible
- Teams validating fit/assembly across multiple units
- Short-run production for launches, beta programs, or early sales
- Products needing material behavior closer to final plastic (flex, snap, toughness)
- Small batches where tooling risk feels too high
Not Ideal For
- Tens of thousands+ parts (injection molding usually wins)
- Ultra-tight tolerances across many dimensions
- Highly complex internal channels that trap air easily
- Parts that must withstand extreme heat/chemicals long-term (depends on resin choice)
Real-world use cases
Here are common ways makers and product teams use RepMold-style workflows:
- Consumer product housings
Make 20–50 shells to test ergonomics, button access, and overall feel. - Wearables and grips
Cast flexible or rubber-like parts for comfort tests and strap iterations. - Enclosures for electronics
Create multiple copies for assembly trials, drop tests, and cable routing. - Medical and lab device prototypes (non-implant)
Produce repeatable parts for usability studies and fixture testing (materials must be chosen carefully). - Automotive/mobility prototypes
Quick test parts for brackets, bezels, knobs, and fit checks during design freezes. - Small-batch accessories
Early runs of custom mounts, adapters, and add-ons before committing to production tooling. - Investor/demo kits
Produce consistent sets that look “real” for meetings, trade shows, and user pilots. - Design validation before injection molding
Confirm geometry, assembly, and user feedback before paying for costly tools.
Materials & durability considerations
Masters: what to use (and why it matters)
Your master is the “source code” for every casting. Good options include:
- High-resolution resin 3D prints for detail and smoother surfaces
- CNC-machined masters for precision and better surface finish
- Post-processed FDM prints if you sand/prime/coat aggressively
Durability tip: keep your master clean and protected. Even small dents or scratches become “features” on every cast.
Silicone molds: what to expect
- RTV silicone molds are flexible and excellent for detail, but they wear out with repeated use.
- Mold longevity depends on:
- Part geometry (thin features, tear molds)
- Resin chemistry and heat
- Demolding technique (yanking is a mold killer)
- Part geometry (thin features, tear molds)
Urethane casting: material behavior and tradeoffs
Urethane resins can be selected for:
- Rigid parts (housing-like)
- Semi-flexible parts (snap features, gaskets)
- Clear-ish parts (often need finishing for true clarity)
In practice, your final properties are shaped by:
- Mix ratios, cure time, and temperature
- Degassing/pressure steps (if used)
- Wall thickness and geometry
Cost, timeline, and when it’s worth it
Typical timeline
RepMold-style workflows often land in “days to a couple weeks” depending on complexity, number of molds, and finishing steps—far faster than traditional tooling cycles that can stretch much longer. (Assumption: small team, one to two part designs, local/desktop production setup.)
Cost reality
- Upfront costs: master + silicone + casting resin + labor/time
- Per-part costs: resin + cleanup + occasional remakes of molds
- Tooling comparison: injection mold tooling can range widely and is often the big upfront barrier.
A simple rule of thumb:
- If you need 1–5 parts, pure 3D printing may be easiest.
- If you need 10–200 parts that must feel closer to production, RepMold-style casting often makes sense.
- If you need thousands+ with consistent economics, injection molding becomes attractive once tooling is justified.
When it’s worth it
- You’re about to lock design decisions and want higher-confidence testing
- You need multiple identical units for pilots or beta programs
- You want better surface finish and material realism than typical prints
- You’re not ready to commit to a full production tool yet
Common mistakes
1) Treating the master as “good enough”
Problem: every defect multiplies.
Fix: sand, fill, prime, and seal; check critical dimensions before molding.
2) Poor venting and gating
Problem: bubbles, voids, short fills.
Fix: add vents at high points; design a sensible pour spout; consider pressure casting for tricky geometries.
3) Bad mold split decisions
Problem: torn molds, distorted parts, ugly seam lines.
Fix: plan split lines along natural edges; avoid slicing across functional surfaces.
4) Rushing cure times
Problem: tacky surfaces, warped parts, weak molds.
Fix: follow cure schedules; keep temps stable; don’t demold early.
5) Designing features that fight flexible molds
Problem: aggressive undercuts, snag, and tear silicone.
Fix: reduce undercuts, add draft where possible, or break the part into subcomponents.
Alternatives and comparisons
RepMold isn’t the only path. Here’s how it stacks up against common options.
Comparison table
| Option | Best For | Typical Lead Time | Cost Range (relative) | Surface Finish | Volume Suitability |
| RepMold (silicone mold + urethane casting) | Realistic prototypes, small batches, pilot runs | Days–2 weeks (varies) | Low–Medium | Good (depends on master) | ~10–200+ parts |
| Traditional Injection Molding | High-volume production, lowest unit cost at scale | Weeks–months | High upfront / low per-part | Excellent | 1,000s–millions (Formlabs) |
| Pure 3D Printing | Fast iteration, one-offs, complex shapes | Hours–days | Low–Medium | Fair–Good (process-dependent) | 1–20 (sometimes more) |
| CNC Machining | Precision prototypes, strong materials, tight tolerances | Days–weeks | Medium–High | Excellent | 1–50+ |
Quick “pick this if…” guidance
- Pick 3D printing when speed and iteration beat everything else.
- Pick CNC when tolerances and material properties matter most.
- Pick RepMold when you need repeatable prototypes that feel closer to production.
- Pick injection molding when demand and design stability justify tooling.
Step-by-step mini guide
- Choose the right part to replicate
Start with a part that benefits from multiples (testing, demos, pilots). - Make a high-quality master
Print at high resolution or machine it. Sand/prime/seal until it looks “final.” - Plan your mold strategy
Decide where the parting line goes, where resin will pour, and where air will vent. - Create the silicone mold
Pour RTV silicone around the master and let it cure fully. - Demold carefully and inspect
Remove the master without tearing edges; clean the cavity. - Cast urethane parts
Mix resin accurately, pour steadily, and allow full cure. - Finish and test
Trim flash, sand seam lines, and run real tests (fit, load, assembly, user feel). - Iterate with intention
If results are off, fix the CAD/master first—don’t “hack” the mold.
Decision checklist
- Quantity: Do I need more than 5–10 copies of the same part?
- Realism: Do I need material feel closer to a production plastic than a typical print?
- Design stability: Is the design stable enough to justify making a mold?
- Geometry: Are undercuts and thin features manageable in a flexible silicone mold?
- Tolerance needs: Are my critical dimensions moderate (not ultra-precision across many features)?
- Timeline: Do I need parts in days to weeks, not months?
- Budget risk: Do I want to avoid large upfront tooling spend right now?
- Testing plan: Do I have clear tests that benefit from multiple identical parts?
FAQ
1) How many parts can one silicone mold produce?
It depends on part geometry, resin choice, and demolding stress. Simple parts can yield more; thin features, deep undercuts, or aggressive demolding reduce mold life. Plan for mold wear and keep your master safe so you can remake molds as needed.
2) Is RepMold the same as injection molding?
No. Injection molding uses hard tooling (often metal) and is designed for high-volume production with low unit cost after tooling. RepMold-style workflows typically use silicone molds and urethane casting for low-to-medium volumes and faster iteration, with higher per-part cost than injection molding at scale.
3) Will cast urethane parts match final production plastics?
They can get close in feel and function (rigid, flexible, impact-resistant options exist), but they’re not a perfect substitute for every production polymer. Treat urethane casting as “production-like” for testing and demos, then validate final performance with the actual target material when you move to manufacturing.
4) What’s the biggest quality driver in this process?
The master. A clean, dimensionally accurate, well-finished master produces better molds and better castings. If your master has layer lines, warping, or bad edges, those defects repeat across every part, making finishing slower and testing less reliable.
5) Is it good for short-run production?
Yes—this is one of its strongest use cases. If you need dozens (or sometimes a couple hundred) parts for pilots, small launches, or user testing, silicone molding + urethane casting can be a practical bridge between prototyping and committing to mass-production tooling.
6) What kinds of parts are “hard mode” for RepMold?
Deep undercuts, ultra-thin walls, intricate internal channels, and parts that trap air easily can be challenging. These often create bubbles, tears, or incomplete fills unless you redesign for molding, add vents, or use pressure/vacuum casting setups.
7) How does lead time compare with traditional tooling?
RepMold-style workflows can often be completed in days to a couple weeks for small projects, while traditional injection tooling commonly takes much longer due to design, machining, and validation cycles. Exact timelines vary, but the gap is usually meaningful in early product development.
8) When should I skip RepMold and go straight to injection molding?
When demand is clear, the design is stable, tolerances are critical at scale, and you need thousands+ parts with the lowest unit cost. The big tradeoff is upfront tooling cost, which can be substantial depending on complexity and materials.
Conclusion
RepMold is best thought of as a multiplier: once you’ve created one solid master, you can multiply it into a small batch of realistic parts that are far more useful for testing, demos, and early customers than a single 3D print. It won’t replace injection molding for scale—but it can save you from committing too early, too expensively, or with too many unknowns.
If you like practical manufacturing explainers like this (the kind you can actually use on a Tuesday afternoon), SCOP Magazine is a solid companion resource as you move from prototype to production decisions—without the hype and without the fluff.